My Halloween decor is a bit sparse, and I desperately wanted to add something to it. So I grab three black frames I had on hand, whet through my scrapbooking paper and came up with this picture decor. I love the way it turned out and how much more personal it makes my space. It's all pretty self explanatory, so there are no before or during pictures. I simply hot glued orange ribbon to the back of the frames, connected them, then to add a little charm, I tied a corresponding ribbon around the orange. Whoa-la! Simple easy and took about 1/2 hour of my day. Can't get any better then that!
Saturday, October 2, 2010
Halloween Decor
Sunday, September 12, 2010
Flowers
I'm thinking these beautiful paper flowers are a must in my girls room! What a great and cheap way to make a big impact to your little girls bedroom decor! Best part is I most likely have all the supplies! Can't wait to give it a try! Head over to The Blueberry Monkey to see how easy these Paper Wall Flowers are!
Friday, August 27, 2010
Candy Pencils
I wish I'd have seen this sooner! I might have made these for the teachers instead of the apples (maybe, it's a toss up)! Aren't they cute! The Blackberry Vine made these yummy pencils with Rollos and Hersey Kisses!
I guess I'll just save it for another day!
Here's how the apples turned out I made for Kylie's teachers!
I had originally made the leaves out of the sour candy straws, but they broke by that morning, and since I'd eaten all the rest of them :), I had to come up with another idea. I was out of time to fix it before my daughter headed off to preschool, so I came home and printed out a little label, then outlined it with some glitter glue from the dollar store. I was pretty pleased with how they tuned out!
Monday, August 16, 2010
Christmas Calender
So is it really that bad to be looking at Christmas stuff already?? I've actually got my list of gifts all figured out for everyone in my family! Now I just have to get shopping! My goal this year is to have all my shopping done by the end of October, as to fully enjoy the holidays without stress! Every year I'm overwhelmed with one thing and one thing only, getting gifts for everyone. I've vowed ever year to get my shopping done early, but thanks to money, it never seems to happen. The worst part is I find it hard to focus on the true meaning of Christmas! I've tried every season to get in the right mind set, but it never happens, this year will be different! I hope........
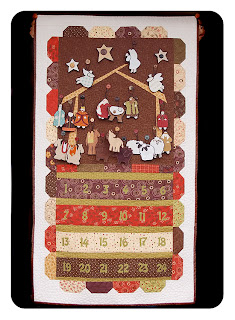
When I came across this Christmas calendar I knew I had to have one! Oh I wish I could sew! I'm lousy with a sewing machine, and the one I have is an old hand me down. The last time I got it out, I could not for the life of me figure out how to thread it! I'd done it before, but this time, it was hopeless. However Ashlee Woolf has amazing sewing skills and was kind enough to showcase her beautiful Christmas calender and I want one! I'm thinking I might actually try it as a magnet board instead. I'll let you know how mine turns out (whenever I get around to it).
When I came across this Christmas calendar I knew I had to have one! Oh I wish I could sew! I'm lousy with a sewing machine, and the one I have is an old hand me down. The last time I got it out, I could not for the life of me figure out how to thread it! I'd done it before, but this time, it was hopeless. However Ashlee Woolf has amazing sewing skills and was kind enough to showcase her beautiful Christmas calender and I want one! I'm thinking I might actually try it as a magnet board instead. I'll let you know how mine turns out (whenever I get around to it).
Sunday, August 15, 2010
Acorn Cake
Again, I know I'm ahead of myself with the holidays, but I came a cross this cake and thought it just looked SO delicious! Oh it'd be great for Thanksgiving!
I actually really don't enjoy cooking, but when it comes to cakes or anything involving sugar, I can usually find the desire to do a little baking!
Saturday, August 14, 2010
Stocking Holder
I know it's early, but I saw this and knew I had to save it somewhere! So here I will save it! Stocking holders are not something I particularly love. They're heavy and just downright dangerous with kids in the house (or even pets)! I usually use those command strip hooks every year, but this year, I hope to be using something a little different! The Many Faces Of Mom made these amazing stocking holders and was kind enough to show us all how to do it ourselves! It's genius I tell ya!
All dangers go out the window, it's decorative and will actually hold the goodies Santa leaves behind, unlike most of your traditional stocking holders!
All dangers go out the window, it's decorative and will actually hold the goodies Santa leaves behind, unlike most of your traditional stocking holders!
Friday, August 13, 2010
Laundry Room Dream
Awhile ago I came across a post of an amazing laundry room make over. The best part, the storage under the washer and dryer! I'm dying to get my hands on a nice front load washer and dryer and when I do, I will beg my husband to build me one of these!
Show & Tell gives step by step instructions making it look so easy! Hopefully it will be a project the hubby wouldn't mind taking on, although I'd like to think I could do it myself if I had too!
Thursday, August 12, 2010
Gift For Teacher
I've been wanting to give a gift to my daughters teachers this year, but wasn't sure what to give them. I don't know them (I think she'll have two teachers), the budgets a little tight, and I'm not in the mood to spend forever on a project (thanks to my lazy pregnancy hormones). So when I stopped by Someday Crafts and saw these adorable little apples, I knew I'd found my gift! I'm off to the store tomorrow to purchase my supplies, oh I can't wait! I love simple projects!
Tuesday, August 10, 2010
Personalized Home Decor
Here's another creative idea I have to save! The Crafting Chicks came up with the gorgeous canvas picture display! If you had enough members in your family, you could do the word 'FAMILY' also! What a great gift this would make for grandparents! So excited to give it a try!
Sunday, August 8, 2010
Knockoff Clock Face
I just have to bookmark this idea because holy clever!! Remodelaholic come up with this oh so cute decor, and so cheap too! So my type of project! The tutorial can be found here. You have to take a look at how she made this beautiful wall clock face! I can't wait to give this a try.


Sunday, May 30, 2010
Art Supply Organizer
A while ago I found an old milk carton holder turned into a child's art supply holder. Ever since I've been on the look out for something similar. My children's markers, crayons, scissors, glue etc. are ALL over my house at times and so unorganized. Then I came across this little gem!

Some people just have that creative gene! LOVE this idea from Me Making Do! I can't wait to give it a try and oh how cheap this will be!

Some people just have that creative gene! LOVE this idea from Me Making Do! I can't wait to give it a try and oh how cheap this will be!
Thursday, May 20, 2010
I found this over at Random Acts of Obsession, and I'm so wishing I'd seen it sooner! How cute is this birthday wreath!!! I'm so making this to hang on my door when my girls birthdays come around next year!
Wednesday, May 19, 2010
Girls Hair Styles
I have two adorable little girls whom I'm completely OBSESSED with! Just to tell you a little about myself, I am the oldest and ONLY girl in my family. Growing up with four younger brothers was not exactly a princess fairytale. There are many times I long for a sister, especially the moment when I see other sisters shopping, crafting, taking their kids to the park etc. So for me to have two little girls is like being in heaven! Yes I'm aware my opinion will most likely change as the teenage years begin, but for now, I love it! I came across a couple of websites showing amazing hair styles for little girls and I have completely become addicted! Unfortunately, my girls were both born without much hair, so it's taken FOREVER to get to the point were I can actually do something cute with my oldest hair. Sadly, my youngest straggly hair looks a lot like Einsteins at the moment! Poor girl is so bald on top, I can't even do a cute little ponytail on top without her looking like she has a receding hairline! But yes, my oldest finally has enough hair to play with, and play with I do! I found these photos on The Story Of A Princess And Her Hair, and I just had to try it out! I was wishing I'd seen it for Valentines Day, but I didn't, so I decided Mothers Day would be a great day to do this wonderful style!
My daughter LOVES this! She has since asked for hearts in her hair several times!
My daughter LOVES this! She has since asked for hearts in her hair several times!
Monday, May 17, 2010
Little Einstein Birthday Party
My daughter tuned four this year, and is OBSESSED with Little Einsteins. So a Little Einstein party was a must for her. These are the invitations I made with my photoshop program. (Download is at the end of this post).
I printed the Little Einstein characters on sticker paper, than put them on the card with pop-up dots. That way the kids had something to enjoy while the waited for the day of the party to arrive. Yes I know I messed up on the time and had to use a pen to correct it. Sadly I didn't catch it until a friend pointed it out after I had handed out a few of them.
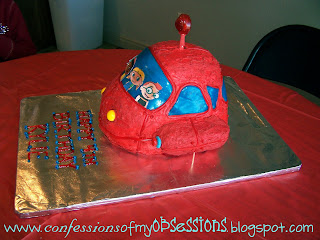
Yes I made her cake! Of course I had to keep the Little Einstein theme going, so I made a four layer cake using a 9" round cake pan. Stacked them up, cut to size and obviously frosted it in red (I had to mix in TWO of the Wilton red (no taste) food coloring)!
I love decorating with candy, so the windows are made out of blue Airheads, the antenna is a Tootsie Roll sucker, headlights are Jaw Breakers, the rockets are Twinkies with red M&M's and Shockers on the front, and the entire thing is outlined with Licorice pull-n-peel. I desperately wanted to make the characters with edible stickers, but procrastinated too long and didn't have time to order them off the internet (turns out Albersons can actually do it for you too). Since I wasn't sure where to go here in town, I had to just print them off the computer and use peanut butter to make them stick. The peanut butter made a grease mark on the paper, so I probably should have gone a different route.
For their party hates, I made these! They were meant to resemble the antenna on Rocket. What do you think? (For a download, see the end of this post.)
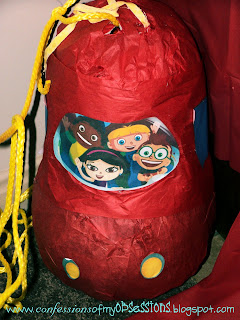
I'm also a cheapskate so I made the pinata. No way was I going so spend $20 on something the kids were were going to break. So I found this tutorial here and decided making my own was a must! So I taped two balloons together and went to town! I then covered it in tissue paper and glued on Little Einstein printouts. Here's a tip: Make this at least a week in advance! I made it two day before and well...... it didn't quite dry all the way, so I had to pull out the hair dryer that morning!
So you know how everyone makes cars and trains out of cardboard boxes?? Well I wanted to make rocket, so this is what I came up with!
I painted a bunch of boxes red, and glued on Little Einstein cutouts for the kids to color! I bought some blue ribbon to use for the "seat belts" but it wasn't working out so well, and I ran out after the second box! (Had no idea I needed so much!) So instead, I used ribbon for wrapping, and it worked out great! If only I would have had blue on hand! I also bought some buckles on eBay to resemble the seat belts on rocket.
Here's the birthday girl sporting her masterpiece!
So why do we need these rockets you ask? Well I'll tell ya! We went on a treasure hunt! I hid a map I made inside the pinata. On this map, it displayed pictures of four different parts of the world! We climbed into our rockets and "Blast Off"!
(Feel free to use this if it's to your liking.) I printed it up on some paper, crumbled it up and inked it to make it look old.
Unfortunately, this is the only picture I have of the actual map. And of course, I didn't get any pictures of the places we flew off to, so you'll have to read about it. The original plan was to get poster size printouts of all these places, hang them up around the house and have the kids "travel" the world. But it was much to costly for my budget, and I couldn't figure out how to print a poster size on my computer (to tape it all together), so they had to deal with a regular old paper printout taped on various walls. At each place, there was a puzzle piece hidden. Once they gathered all the pieces they put them together to show the place where the treasure was hidden!
Here's what the treasure was:
(Again, the download for the tag is at the end of this post)
Here is what each bag contained. If you're aware, Little Einstein is very musically inclined, so of course I had to add all the instruments I could find!
Hope this party was enjoyable for you!
Go here to download all my printouts! Thanks for stopping by!
Labels:
Birthday Parties,
Cakes,
Little Einsteins
Fathers Day Tie Box
I found this template on procrastinstamper and LOVE it! This would be perfect for kids to make for their Dad's on Fathers day!
Sunday, February 7, 2010
Jewelry Organizer
So I know my jewelry collection is in need of a major makeover, but what few nice things (and not so nice things) I have, end up getting tangled or lost. So I decided it was time to put an end to the madness! I combined two ideas I found here and here, to make my own little creation on a rather large frame.
You could so dress this up in many different ways! Use an kind of fabric and corresponding decorative paper, and you've got yourself a beautiful way to display all your fabulous jewelry! (Or in my case, not so fab).
I took out the glass off (obviously) and covered cork board with a white sued like cloth I found at walmart for a $1 a yard!
Lined the bottom with ribbon containing loops (I'm sure there's some fancy name for it, but I havent a clue what it is) for the earrings.
I than used glass tiles and mod podged some scrabook paper onto it.
Than glued thumb-tac's to the back.
Put them on the board, and voila!
Subscribe to:
Posts (Atom)


